One Code Compare Report
SELECT CODES REPORTS
PURPOSE:
This option allows you to compare any PAY CODE for a period of one or more weeks, to the year to date of the same PAY CODE. Use this report for comparing activity of a pay code for items such as Salaries on a quarterly basis against the year-to-date salaries.

KEEP IN MIND
You can run reports as many times as you wish. For reports to print the following files must exist:
- A valid COMPANY MASTER in Menu #1.
- Valid EMPLOYEE MASTER records in Menu #5.
- Valid PAY CODES file in Menu #8.
- Existing CHEQUE HISTORY in Menu #9.
Each calendar year has it's own historical data files, specify which year you wish information to be retrieved from. The program defaults to the current year if no entry is made.
Reports list only those earnings records that are considered active (the earnings record STATUS is NOT an X}. Limitations placed on listing MUST be MET or data is not printed
When reports are run, all PAY CODES to which dollar amounts can be applied will be shown on the report. Only detailed reports show the amounts broken down by employee.
LISTING CHEQUE HISTORY INFORMATION
To list existing Cheque History information, do the following:
1) At the KLM Payroll System Selection Menu, select One Code Compare. The appropriate selection screen will appear.
2) While at this selection screen, if you leave the defaults in place and simply RUN the report, you will get a Year-To-Date report, for the current year, for ALL employees in all companies, in summary format.
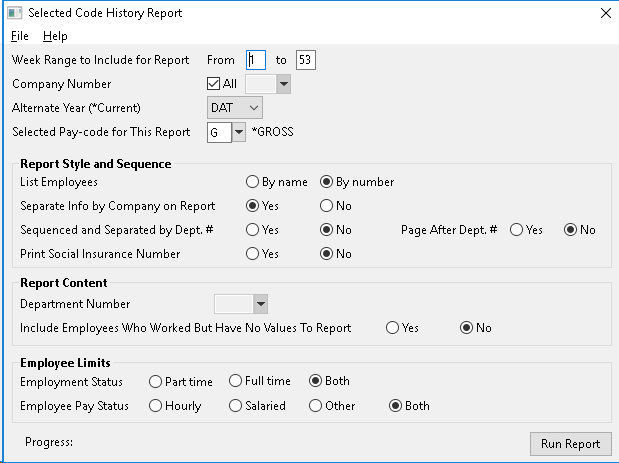
Report Options
Use the report selections provided to customize your own reports.
DATA LIMITS
Include the calendar year, the company for which you are reporting, a the PAY WEEK range (1 to 53) and a specific pay code. Pay CODE must be valid.
REPORT STYLE AND SEQUENCE
Selections determine how much information is listed AND SEQUENCE of data (in what order it is listed).
- Report Style limits you to 2 choices: SUMMARY which prints 1 line of data per limit, or DETAIL printing 1 line per employee.
- Report Sequence is limited to Employee NAME or NUMBER order. Only lists in DETAIL can be listed in NAME order.
- Separate by Company allows you to print all companies, one after the other.
- Separate by Department allows you to print all departments, one after the other.
REPORT CONTENT
Separate by Company provide you with a means to limit what information is printed, by excluding records that don't contain the appropriate information.
- Selecting a specific DEPARTMENT number limits the Employees listed to just those who's Master records list that specific Department.
- You can also choose to report on employees who are active but may have NOT have records within the range of records specified.
EMPLOYEE LIMITS
These two prompts allow you limit the report to certain kinds of Employees.
- Employment type includes those who are FULL or PART Time or BOTH
- Employee Pay for those who are SALARY or HOURLY or Other or BOTH
In both cases, this is determined by the contents of the Employee's Master record (PAY#5).
PROBLEMS LISTING CHEQUE HISTORY INFORMATION
EMPLOYEE records are sorted by both EMPLOYEE NAME & NUMBER. Saving you time, by speeding up record access when printing.
If any of the following occurs when you are trying to list or retrieve records:
- Records are missing; not on reports etc.
- Report listings appear to be repeating themselves; listing the same records over & over.
- Reports stop part way through listing.
If the sorting function of this option has been disrupted. To reset the SORTING functions do the following:
a) If asking for your listings by **Employee Name **sequence, try asking for the same report by Employee Number.
b) If the report runs without incident, the error lays in the EMPLOYEE NAME SORT function. See EMPLOYEE MASTER UTILITIES for instructions on re-setting name sequence.
OR
1) If the report is still in error, then the problem lays with either a) limits placed upon the report or b) EMPLOYEE NUMBER SORT function.
2) For situation a) verify that the information exists Verify the contents of Menus 1, 5 and 9.
OR
2) For situation b) then do an EMPLOYEE NUMBER SORT. See EMPLOYEE MASTER UTILITIES for instructions on re-setting the number sequence.