Setting up Employees
Employee Setup Information
Purpose
To store all needed information for each employee. All employees presently working for your company MUST be stored in this file, before any pay cheques can be issued (Menu #20). This file is used in ALL of the following:
- Default information for pay input
- Calculation of deductions CPP/EIC/TAX etc
- Accessed when printing reports and/or forms
Requirements
Have the following information available to set up new records:
- Employee's Full Name, mailing address & telephone No
- Employee's Social Insurance Number (required by law)
- Pay Rate (per hour/per week) & Pay Type (Hourly/Salary)
- TD1(E) Total Tax Credits (items 1 to 8)
- TD1(E) Additional Tax (items 9 & 10)
- Employees Health Tax (EHT) Number
- Date of Birth
- Date of Hire (1st day worked)
- Labour Number/Department Number (optional)
- Vacation Weeks Schedule/Vacation Pay % (optional)
- Billing Information (optional)
- Banking Information (optional)
T4 Forms
These forms retrieve at least a portion of their data from this file. The Employee's Name, Mailing Address, Social Insurance Number etc. MUST be accurately reported.
Report On Hiring-Details for Month Of
Many employers voluntarily take part in a program, run by Revenue Canada, in which they report to the government, the number of employees they hire for each calendar month.
TD1 Personal Tax Credits Return Form
By law, you the employer, are required to fill out a TD1 form for each employee presently working for your company. The TD1 net claim amount (not CODE) is used in the tax calculation. If an amount is not entered the basic is taken.
About This Option
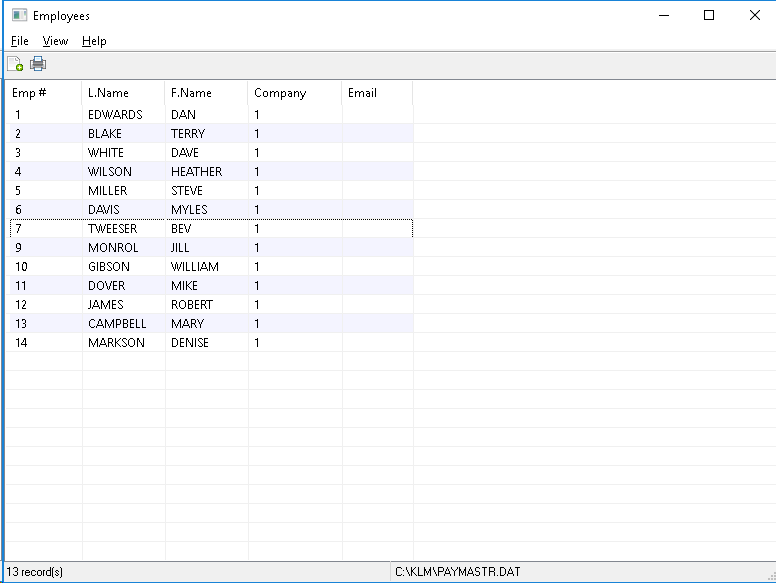
Upon entering this option, the first screen displayed will be a listing of all employee records in this file. To select any record, Double Click on it and an edit screen for that record will appear.
NOTE: The default listing of records is always in record (Employee) Number order. How records are displayed can be changed by clicking on a LIST Headings.
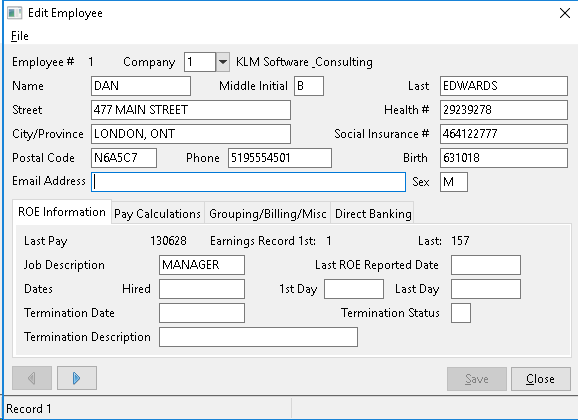
Each Employee Master record is divided into sections, a main section containing items such as Name and Street Address and four sub-sections (ROE Information / Payroll Calculations / Grouping & Billing / Direct Banking) accessed by clicking on the appropriate Tab.
NOTE: You can use the LEFT or RIGHT Arrows (bottom left of corner of EDIT screen) to advance forward or back through existing data records.
Adding a New Employee Master Record
To ADD a new employee, go to the MENU Bar (top left of screen) and CLICK on FILE, than CLICK on NEW (or use the Task Bar NEW Icon instead). A blank EDIT screen for the next record (Employee Number) in order.
Once all required fields have been entered, save the new record by CLICKING on the SAVE Button (bottom right of screen). Add another NEW record (by the above method) or exit the option.

If you require further information about the records contents, see the FIELD Definitions section.
Modify an Existing Employee Master Record
Upon entry of this option, the program displays a listing of all employees in this file by EMPLOYEE #. Select the employee whose record you wish to modify by moving the cursor to that employee on the list. Double Click and that employee's information will be displayed in the edit Screen.
.
Make what changes you wish (remember there are 5 sections to each record), then save your changes by CLICKING once on the SAVE Button (bottom right of your screen). You can do this from any of the 4 screens. Select another employee or exit this menu option.
List Existing Employee Master Records
There are two ways to list data for this Menu option. You can, by use of the MENU Bar, obtain a simple list of all Employees in this file (basically a hard copy of record listing). The only information printed will be EMPLOYEE NO. NAME and COMPANY NO.
To obtain said list, go to the MENU Bar, CLICK on FILE than CLICK on PRINT. A standard Windows PRINT SET Window will appear. Select your printer than continue.
If you wish a more detailed list of Employee information or require your listing to be limited to specific employee types, use the more detailed option of EMPLOYEE MASTER REPORT which can be accessed from the PAYROLL SYSTEM Main Screen.
Field Definitions
Each employee record is divided into 5 sections.
Main Information
EMPLOYEE NO |
DISPLAY ONLY. The program assigns an Employee Number to each NEW record. Use this number when entering payroll information in the Pay Input section, (Menu #19). |
COMPANY |
Select the Company to which this employee belongs from a DROP DOWN listing of VALID |
NAME (first) |
In this field record the employee's first name. |
MIDDLE INITIAL |
Optional: Record the employee's middle initial representing a middle name. |
NAME (last) |
In this field, record the employee's last name. |
STREET |
In this field, record the employee's mailing address. |
CITY, PROVINCE |
In this field, record the city and province in which the employee lives. Short forms are allowed. |
POSTAL CODE |
In this field, record an employee's postal code.Use capital letters and DON'T include the space. |
PHONE (Number) |
In this field, record the employee's home phone number.You can include the area code if desired. |
HEALTH # |
Enter the Employee's Health card number (Ontario). |
SOCIAL INSURANCE No |
Enter the employee's Social Insurance Number. The SIN# prints on T4 Forms. |
BIRTH DATE |
Enter employee's date of birth in year-month-day format (i.e. 651223). This field helps determine if an employee is eligible for CPP / QPP deductions. |
SEX |
Optional. Enter the gender of the employee (F for female, M for Male). |
ROE Information Tab

LAST PAY |
This is a display only field. The system automatically updates this field whenever a pay cheque is issued. |
EARNINGS RECORD |
These are display only fields which were used by the Payroll System software. |
JOB DESCRIPTION |
In this field, enter the job title or description of this employee's job function. |
LAST ROE |
This field should contain the date,in year-month-day format, on which the last ROE was issued. This date is very important if an employee is issued several ROEs due to frequent layoffs (i.e. work shortages). |
DATES: HIRED |
Enter the date of hire in year-month- day format. |
DATES: 1ST DAY |
Enter date, in year-month-day format, of the first day the employee actually worked. |
DATES: LAST DAY |
Enter employee's last day of work, upon termination. Enter date in year-month-day format. |
DATE:TERMINATION |
Enter employee's date of termination in year-month-day format. |
TERMINATION |
Fill in this field ONLY if an employee has been terminated. For terminated employees enter the correct termination code from the Record of Employment form. |
TERMINATION |
Enter a reason for termination, corresponding with the reason given for issuing the Record of Employment. |
Pay Calculation Tab
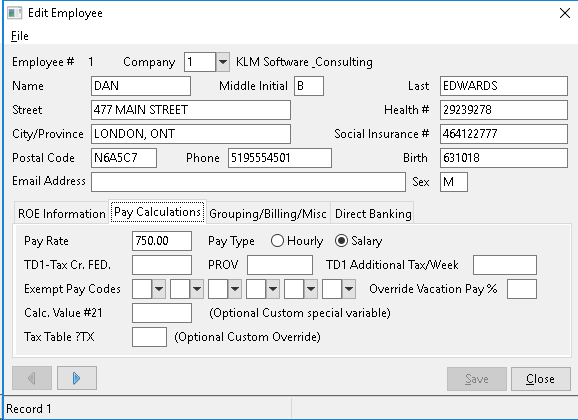
PAY RATE |
For salaried employees enter a weekly dollar amount even if you don't pay employees on a weekly basis. For employees paid hourly, enter the dollar amount normally paid for one hour's work. |
PAY TYPE |
Click on SALARY if employee is paid a weekly salary. Click on HOURLY employee is paid an hourly rate. |
FED:TD1-TAX CR |
Leave this field BLANK unless the net claim amount on the employee's TD1 form differs from the basic amount allowed. Enter 99 if the net claim amount is zero. This field is used in the tax calculation. |
PROV:TD1-TAX CR |
Same instructions as the FEDERAL TD1. |
TD1 ADDITIONAL |
An additional amount of tax can be deducted from the TAX/WEEK employee's pay cheque, by entering a WEEKLY dollar amount based upon the information on their TD1 Form. |
EXEMPT PAY CODES |
Enter up to **6 valid pay codes **to exempt the employee from various payroll deductions. Use the PULL DOWN Menus to select form VALID Pay Codes. As these codes do effect an employee's pay, be sure of the code you are selecting and the effect it will have on an employee's pay. |
OVERRIDE VAC PAY % |
Optional: This field allows you to calculate vacation pay percentage (for hourly employees) at a higher level than the default in your COMPANY MASTER file. |
CALC.VALUE #21 |
Optional: Flat rate value that can be used in conjunction with the pay codes file in producing a unique calculation for each employee such as a company pension amount or tax rate for commission earnings. |
TAX TABLE? TX |
For use with custom programs. Leave this field blank. |
Grouping/Billing/Misc Tab: Optional
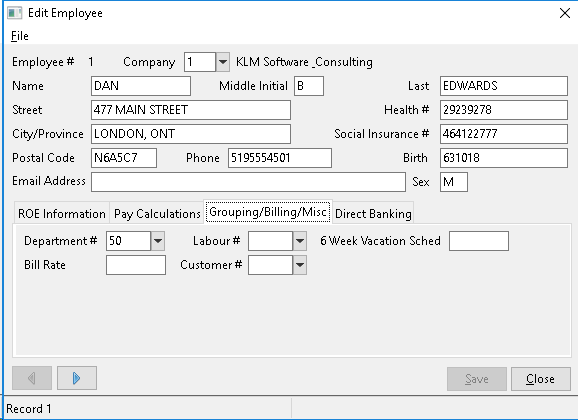
DEPARTMENT NO |
Optional: Assign this employee to a specific department. Department Number MUST be valid. |
LABOUR NUMBER |
This field is NOT used by the Basic Payroll System. It can be left BLANK. |
6 WEEK VAC. |
Optional: Enter the number of vacation weeks an employee is eligible for. |
BILL RATE |
This field is NOT used by the Basic Payroll System as such, it can be left BLANK. |
CUSTOMER NO |
This field is NOT used by the Basic Payroll System as such, it can be left BLANK. |
Direct Banking Tab: Optional
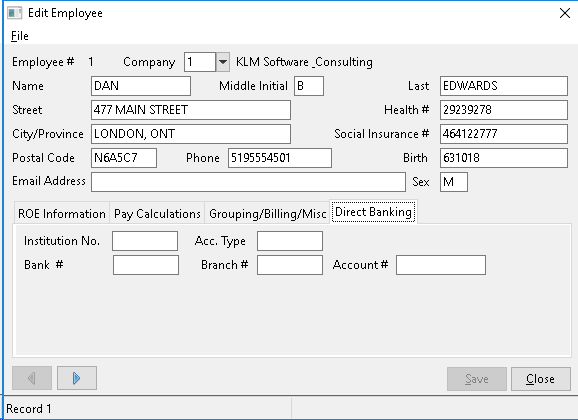
FINANCIAL INSTITUTION NO |
Optional: This field can contain any data unique to this customer. |
BANK NO |
Optional: Enter a valid banking institution number for the bank to which an employee's pay cheque will be deposited. |
BRANCH NO |
Optional: Enter a valid branch number for the above banking institution. |
ACCOUNT NO |
Optional: Enter a valid account number, into which the pay cheque will be deposited. |
ACCT. TYPE |
Information only: In this field, a code for type of account, such as {SAV} for savings account. |